Cabel Label Layouts
Starting with our early windows based systems we introduced the concept of a “Cabel Labels Layout”.
Layouts provide the information which enables the Cabel Labels Database System to:
• Select the desired Fields from the Database
• Determine where to display the Field on a Cabel Label
• Determine how the Field will be displayed on a Cabel Label
So a Cabel Labels Layout enables the user to customise every aspect of their printed Cabel Labels.
To make things simple we provide a number of Layouts as standard,
one is automatically created with every database: “The Classic”.
The following pages contain Layouts we created by various customers, these are only a sample of what can be achieved!
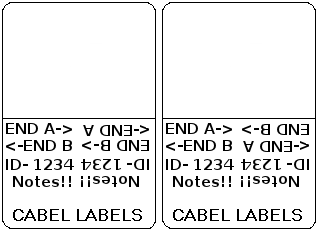
The “Upside Down” Layout
There is no doubt about it, at times it’s impossible to get into a position to read the label! And when this happens……the writing is always upside down!!
Enter the UPSIDE DOWN LAYOUT, a new feature we have added to solve this problem once and for all.
It works just like any normal layout, BUT, the text is repeated UPSIDE DOWN!
Below is an example ideally suited to bad situations, it uses big bold text and the Upside Down Layout.
As we selected “Alternate Options”, beside it is the other label!

The “Classic” Layout
This is the standard Layout “built in” to every Database System, hence it’s also the most well used and famous as well!
It strength is in situations where concise and simple labeling is required
This is made clear by looking down the lines on the Cabel Label, all the essential information for a cable is present. To make this example Cabel Label easy to follow we typed the Fields Names into the Database rather than real information.
Looking at each line on the Cabel Label in turn:
The first line is the Termination Data for one end of the cable (End
A), notice the arrow on the right hand side of the Data indicating which
end of the cable this Data applies to.
The second line is the Termination Data for the other end of the cable
(End B), notice the arrow on the left hand side of the Data indicating
which end of the cable this Data applies to.
The third line is the Cable Number or Cable Identification Code for the
cable. This is a common format, however our Software is able to create
many types and styles.
The fourth
and fifth lines are available for any further information that may
assist the user. Example. in analog broadcast use the words: “TIMED” are often placed here to indicate the cable’s length is critical.
The “Classic” Layout with Toggle
This is the CLASSIC Layout after a simple modification.
We made a copy of the CLASSIC Layout and then set the “Toggle Options” for “End A Termination” to “TOGGLE” with End B Termination”. When printing, this causes every second Cabel Label to swap the positions of “End A Termination” and “End B Termination”. In case this is not too clear, take a quick look back at the CLASSIC on the previous page and you will see they are the other way around!
The important point is that you only store the data in the Database once, it is swapped during printing so you do not have to duplicate the information which is confusing!
Looking at each line on the Cabel Label in turn:
The first line is the Termination Data for one end of the cable (End
B), notice the arrow on the left hand side of the Data indicating which
end of the cable this Data applies to.
The second line is the Termination Data for the other end of the cable
(End A), notice the arrow on the right hand side of the Data indicating
which end of the cable this Data applies to.
See how they are reversed to the CLASSIC?
The third line is the Cable Number or Cable Identification Code for the
cable. This is a common format, however our Software is able to create
many types and styles.
The fourth
and fifth lines are available for any further information that may
assist the user. Example. in analog broadcast use the words: “TIMED” are often placed here to indicate the cable’s length is critical.
Schematic on the Fly® 1
To illustrate how integrated Schematic on the Fly® is with our Database System, this Layout contains “End A Equip”, “End B Equip” and “Signal Flow” all of which are obtained from Schematic on the Fly®.
Looking at each line on the Cabel Label in turn:
The first line has effectively been split into halves. The Left side contains Equipment Field for End A and the right side contains the Termination Data for End A.
The next line indicates the direction the signal is traveling along the cable.
The third line has also been split into halves. The Left side contains Equipment Field for End B and the right side contains the Termination Data for End B.
The forth line is the Cable Number or Cable Identification Code for the cable. This is a common format, however our Software is able to create many types and styles.
Schematic on the Fly® 2
This example is only slightly different from the previous. Note the way in which the Termination Data is now sitting hard against the right hand side of the Cabel Label. This ensures that Equipment Names and Termination Data have the maximum space possible.
Looking at each line on the Cabel Label in turn:
The first line has effectively been split into halves. The Left side contains Equipment Field for End A and the right side contains the Termination Data for End A.
The next line indicates the direction the signal is traveling along the cable.
The third line has also been split into halves. The Left side contains Equipment Field for End B and the right side contains the Termination Data for End B.
The forth line is the Cable Number or Cable Identification Code for the cable. This is a common format, however our Software is able to create many types and styles.
Schematic on the Fly® 3
This example is a TOGGLED version of “Schematic on the Fly® 1”. In this case the position of “End A Equipment” and “End A Termination” are toggled with “End B Equipment” and “End B Termination”.
Looking at each line on the Cabel Label in turn:
The first line has effectively been split into halves. The Left side contains Equipment Field for End B and the right side contains the Termination Data for End B.
The next line indicates the direction the signal is traveling along the cable.
The third line has also been split into halves. The Left side contains Equipment Field for End A and the right side contains the Termination Data for End A.
The forth line is the Cable Number or Cable Identification Code for the cable. This is a common format, however our Software is able to create many types and styles.
Company Logo and Text
Existing customers will recognise this as the Cabel Label on the pens we give away at exhibitions!
Although its use is primarily for advertising it illustrates the flexibility of Cabel Label Layouts.
Looking at the various elements displayed on the Cabel Label in turn:
In the top left corner is a graphic; in this case a simple bitmap drawing of a Cabel Label. We chose to position it here although we could have positioned it anywhere on the Cabel Label.
Next to and below the Graphic are various Fields using different Fonts, alignments and Colours. This illustrates how how all these parameters are under the control of the user.
Big Numbers and Text.
Sometimes minimal connection/termination information is required. This example illustrates a typical Cabel Label Layout which handles such specialised applications.
Looking at the various elements displayed on the Cabel Label in turn:
You certainly cannot miss the top line, its enormous! By using this Cabel Labels Layout the user can make sure sure that the person reading the Cabel Label will be in no doubt about the cables purpose.
The Cable Number or Cable Identification Code is below the first line making sure that the cable can be traced back to a “Schematic on the Fly®”.
Number Bands
Repeating information either vertically or horizontally is another specialised application Cabel Label Layouts handle seamlessly. This can be very handy when indicating the function of a cable, or, as shown here only one end of the cable’s termination details are required.
Number Bands
Repeating information either vertically or horizontally is another specialised application Cabel Label Layouts handle seamlessly. This can be very handy when indicating the function of a cable, or, as shown here only one end of the cable’s termination details are required.